

Odyssey Mosaic Blanket Crochet-A-Long Video 9
Week 6A Zeus
Video 9
With the front of the blanket facing you,
Working with Cream (white squares) and Grape (grey squares).
Front Border
Whilst you are doing Round 1, count your stitches per side. But NOT counting the corner sts!
You need to have a multiple of 4 + 1 along each side, to ensure your design in Round 5 works out. So you have 4 rounds to achieve this, but you do not count the stitches in the corners, you only count the stitches on the actual sides.
Round 1
SK, starting with a STST, place 2FPDC around each dc post on the top and base of the blanket and 2FPDC around 2CHs on the sides of the blanket, in the corners place 2CH. SS to close the round, cut off yarn.
Tip Do this very tightly so you do not get a wavy border, maybe go down half a hook size!
Place stitch markers in the first st after the corner and last st before the corner.
Round 2
SK, starting with a STST, and starting in a corner,
{create a corner by placing 1SC 2CH 1SC in a corner CHSP,
create a side by placing 1SCBLO in each st}, repeat {-} 4 times, SS to close the round, cut off yarn.
Tip Maybe use your usual hook again
Round 3
SK, starting with a STST, and starting in a corner,
{create a corner by placing 1SC 2CH 1SC in a corner CHSP, 1SCBLO in the first st after the corner,
create a side by placing 1SCBLO in each st, and 1 SCBLO in the last st right in front of the corner}, repeat {-} 4 times, SS to close the round, cut off yarn.
Round 4
SK, starting with a STST, and starting in a corner,
{create a corner by placing 1SC 2CH 1SC in a corner CHSP, 1SCBLO in the first 2 sts after the corner,
create a side by placing 1SCBLO in each st, and 1SCBLO in the last 2 sts right in front of the corner}, repeat {-} 4 times, SS to close the round, cut off yarn.
Check to see if each side, between the stitch markers now has a multiple of 4 +1 sts.
Round 5
SK, starting with a STST, 1SCBLO in the 3 sts before the corner,
{create a corner of 1SC, 2CH, 1SC
create a side of 1SCBLO in first 3 sts, (ensuring you are now above the first FPDC in round 1 to place your first DCFLO), *1DCFLO in next st, 1SCBLO in the next 3 sts* repeat *-* to end, 1DCFLO in the next st, 1SCBLO in the next 3 sts,} repeat { - } 4 times,
Omit the last 3 sts as you did those to start with,
SS to close the round, cut off yarn.
Tip Make sure you place that first DCFLO above the first FPDC in Row 1
Round 6
SK, starting with a STST, 1SCBLO in the 4 sts before the corner,
{create a corner of 1SC, 2CH, 1SC
create a side of 1SCBLO in first 4 sts, then 1SCBLO in the next 2 sts *1DCFLO in next st, 1SCBLO in the next 3 sts* repeat *-* to end, 1DCFLO in the next st, 1SCBLO in the next 2 sts, 1SCBLO in the next 4 sts,} repeat { - } 4 times,
Omit the last 4 sts as you did those to start with,
SS to close the round, cut off yarn.
Round 7
SK, starting with a STST, 1SCBLO in the 5 sts before the corner,
{create a corner of 1SC, 2CH, 1SC
create a side of 1SCBLO in first 5 sts, *1DCFLO in next st, 1SCBLO in the next 3 sts* repeat *-* to end, 1DCFLO in the next st, 1SCBLO in the next 5 sts,} repeat { - } 4 times,
Omit the last 5 sts as you did those to start with,
SS to close the round, cut off yarn.
Round 8
Repeat round 2
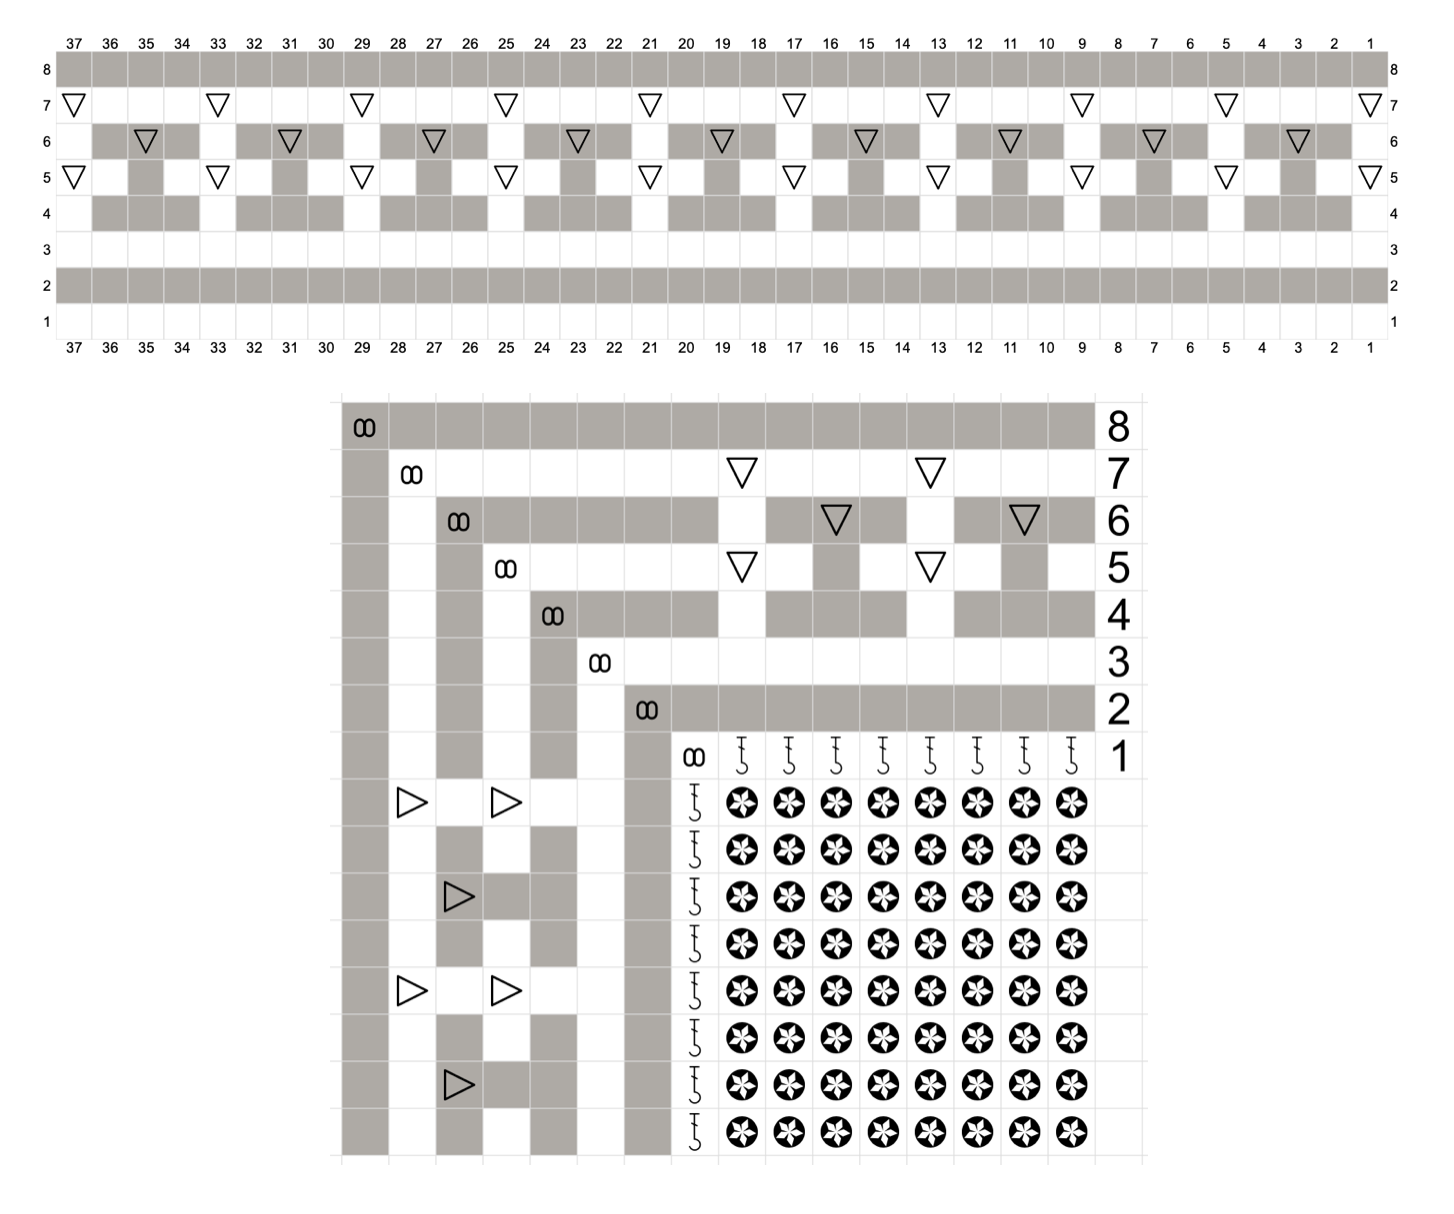
Week 6 A
Mosaic Charts for the Border
White = A colour (Cream)
Grey = B colour (Grape)